Monday, 11 January 2021

40 Latest Interview Questions and Answers on Spring, Spring MVC, and Spring Boot


40 Latest Interview Questions and Answers on Spring, Spring MVC, and Spring Boot

1. What is Tight Coupling?

When a class (ClassA) is dependent on another class’s object (ClassB), then we say ClassA is "tightly" Coupled with ClassB. Spring helps us to create classes in a way that Tight Coupling can be removed and Loose Coupling can be done.

2. What is Loose Coupling?

Loose Coupling removes the dependency of an object (ClassB) on a class (ClassA). Loose Coupling is approached by creating an interface and a setter & getter method, or by using a constructor which takes the interface object.

3. What are Beans in Spring?

When a class is annotated or decorated using the @Component, such a class is called a Bean in Spring. Beans are maintained by Application Context.

4. Explain Bean creation process?

The process of Bean creation has the following phases

(i) Starts with a class (c1) which has the annotation @Component.

(ii) Checks if the component annotated class (c1) is dependent.

(iii) If yes, then Spring will create a bean for that class (c2) too.

(iv) A connection or autowiring will occur between the two classes (c1 and c2) using @Autowired annotation and also through the constructor (c2) or the default case setClass Function (interface the Interface).

5. What is the importance of the annotation @Primary

This annotation is used on a class that needs to be taken by spring on a primary basis. For instance, if ClassX is @Component annotated and is dependent on both Class1 and Class2 (both @Component annotated) then the compiler would report an error. To show the primary class between Class1 and Class2 we use @Primary.

6. What is Dependency Injection?

Dependency Injection is where Spring searches for beans; once the appropriate bean is found, it autowires the bean to the dependent class. Dependency Injection is the process where Spring framework looks for the beans and identifies the dependencies, and creates the instances of beans and autowires them.

7. Explain Inversion of Control (IOC).

In Tight Coupling the dependent class takes the responsibility of creating its dependency. Whereas, in Loose Coupling, we use @Autowired annotation over the dependency class (or reference) and Spring takes control of creating the instance and injects the dependency.

8. What are the roles of an IOC (Inversion of Control) Container?

IOC Container does the following things-

 (i) Find Beans

(ii) Identify their dependencies and wire the dependencies

(iii) Manage Lifecycle of the Bean (creation, processing, and destruction)

9. What is Application Context?

It is an advanced version of IOC Container. It provides all the functionalities of Bean Factory and also provides things like AOP, Internationalization capabilities, web application context (request, session, etc).

10. Explain the process of creating an ApplicationContext in Spring.

The ApplicationContext can be defined in two ways (i) using XML, (ii) using @Configuration. Once the configuration is done in any of the ways defined above, the ApplicationContext is created using new ClassPathXmlApplicationContext. The ClassPathXmlApplicationContext looks for the XML files, using this is one of the two ways. The other way is to use AnnotationConfigApplicationContext.

11. Explain Component Scan.

Component Scan is one method of asking Spring to detect Spring-managed components, the input for this search is the packages. Two methods are available to define a Component Scan-

(i) Java Configuration; wherein, we use the @Component annotation to which we specify all the packages, for which Spring does the search.

(ii) XML Configuration- we use <context:component-scan base-package=”com.demo.compscanex”/>

12. How do you perform the same (above question) in Spring Boot?

In Spring Boot the annotation used to perform the scan is @SpringBootApplication. This annotation on a class would automatically initiate the component scan on the package where they are in.

13. Differentiate @Component, @Repository and @Service and @Controller?

Typically a web application is developed in layers like the controller (which is the initial point of client communication), business (where the actual code or logic of the application is written) and DAO (where the database connections and interaction happens). In such an architecture web application, @Component can be used in any of the layers. Whereas, the @Controller is used in the controller/web layer. @Service is used in the business layer and @Repository is used in the DAO layer.

14. List out the different scopes of Bean.

(i) Singleton: throughout the spring context only one instance is created.

(ii) Prototype: a new bean is created whenever requested.

(iii) Request: Every HTTP Request creates a bean.

(iv) Session: A bean for every HTTP Session.

15. List out the types of Dependency Injection.

The types of Dependency Injection-

(i) Setter Injection and (ii) Constructor Injection.

16. What is the difference between the Configuration types XML and Annotation?

These are the two ways of setting up the configuration, and they perform in the say way. Though, when the annotation approach is taken very less amount of code is written and the result would be the same as compared to the XML approach.

17. List out the ways Autowiring is done.

(i) byType
(ii) byName
(iii) Constructor (same as byType, but through constructor)

18. What is Dirty Read?

When a transaction (t1) is meant to read the changes that are performed by another transaction (t2) and provided transaction t2 is not committed yet; then in such a situation, the transaction t1 is called Dirty Read transaction.

19. List out the new features available in Spring Framework 4.0 and Spring Framework 5.0?

Spring 4.0 is the first to support Java features. Spring 5.0 has the support for Reactive Programming and Kotlin.

20. What is a FrontController?

In FrontController, the Servlet will not get the first request; the first request would go to FrontController and the request is passed on to the right servlet. In other words, DispatcherServlet is the front controller which intercepts all the requests from the client and then dispatches to appropriate controllers.

21. What is a ViewResolver?

ViewResolver enables a web application to select its view (such as JSP) dynamically. ViewResolver gets a name which is appended by /WEB-INF/views and a .jsp. All the display on the content is done in an HTML page.

22. List out all the concepts that are available in the MVC Architecture?

(i)  The browser sends a request to DispatcherServlet

(ii) DispatcherServlet knows the HanderMapping and can find the appropriate controllers

(iii) Controllers execute the request and put the data in the model and return back the view name to the DispatcherServlet.

(iv) DispatcherServlet uses the view name and ViewResolver to map to the view.

23. Explain Model Attribute?

The annotation @ModelAttribute is decorated on a method typically present inside a Controller. This will help the method to be available in all other methods available in the controller.

24. What is a Session Attribute?

The annotation @SessionAttributes (“argument”) is decorated on class (Controller). The attribute (argument) that is present in Model is available in the session.

25. Explain the @InitBinder?

This annotation is decorated on a method in which a date format is declared, and throughout the class, the defined date format is used. Whenever the binding happens with a date field @InitBinder; annotation says to use the CustomDateEditor, which in return uses the date format mentioned in @InitBinder.

26. Define @ControllerAdvice?

This annotation is used when logic needs to be implemented commonly in multiple classes (Controllers). For instance, if an Exception or its subclasses, or when an exception is raised in the classes, it will be handled by a method annotated with @ExceptionHandler. Whenever an exception occurs in any of the controllers, the exception is handled by the method annotated with @ExceptionHandler.

27. Why Spring Boot?

Spring-based applications have a lot of configuration (boiler-plate code). In Spring MVC, a lot of configuration is required (like component scan, dispatcher servlet, view resolver, etc). Whereas, in Spring Boot the boiler-plate code is not required.

28. Spring vs Spring MVC vs Spring Boot?

Spring: the most important feature of Spring is Dependency Injection or Inversion of Control.

Spring MVC: provides a decoupled approach in developing web applications. Concepts like DispatcherServlet, ModelAndView, ViewResolver makes web application development easy.

Spring Boot: makes the configuration very easy and automatic using a feature called Auto Configuration, in which the DispatcherServlet is done by Spring internally.

29. What is the role of @SpringBootApplication?

This annotation is used to launch up the entire application. Internally, @SpringBootApplication does the following,

@SpringBootConfiguration: same as @Configuration in a Spring Application.

@EnableAutoConfiguration: auto-configures the classes available in the classpath.

@ComponentScan: all the classes available under a package will be scanned when this annotation is applied.

30. What does an Embedded Server mean in Spring Boot?

To deploy any web application a server like Tomcat is required. In Spring Boot a server (like Tomcat) is available as part of the application in a jar. The concept of Embedded Server makes the deployment of application very easy and independent.

31. Why do we use application.properties?

The file application.properties is used to configure things like database details, log generation, security (username/password), serialization, etc.

32. What is Spring JDBC?

Spring JDBC uses methods like update (query), execute (query) and query (SQL, resultSetExtractor) to interact with the database.

33. What is the difference between JDBC and Spring JDBC?

In JDBC, the checked exceptions need to be written; whereas, in Spring JDBC those exceptions are made into Runtime Exceptions. Which means, exception handling is not manually done in Spring JDBC.

34. What is JPA?

Java Persistence API (JPA) defines the mapping from Java Object to a Database Table. The procedure to map a Java object to a row in a database table is defined in JPA. JPA provides a lot of useful annotations, using which the relationship between classes and tables are defined.

35. What is Hibernate?
Once the mapping is done, Hibernate (a JPA Implementation) will help us create query under the hood and interact with the database.

36. Describe the cases in which the Dependency Injection is done through Constructors and Setters?

When the dependencies are required/mandatory, the Constructor approach is selected. And when the dependencies are optional then the Setters approach is used.

37. What is the importance of POM.XML file?

Project Object Model (POM) is an XML formatted file in which all the configuration for a maven project is defined. The most commonly used tags in POM.XML are <groupid>, <artifactId>, <version>, <packaging> and a few more.

38. What does the @RequestParam annotation do?

This allows the server side to read from data and automatically bind it to a parameter coming into the method.

39. What is Spring Security?

Spring Security provides security services to J2EE applications. Spring Security is implemented using Servlet Filters under the hood. Servlet Filters are used to pre-process or post-process web requests.

40. What is CSRF?

Cross-Site Request Forgery (CSRF) is a security attack where a fraudulent website tricks the user into performing an event on the web application that he/she is logged into. For instance, if the user is logged into the online banking account, this attack tricks the user into transferring the money to an unknown person.

Saturday, 9 January 2021

React-Interview questions


React Interview Questions


React is an efficient, declarative, and flexible open-source JavaScript library for building simple, fast and scalable front-ends.

For developers coming from JavaScript background, the process of developing web applications becomes easier.

Let’s understand the core concepts of React, by answering the frequently asked interview questions.

1. What are the advantages of using React?

MVC is generally abbreviated as Model View Controller.

  • Use of Virtual DOM to improve efficiency
    React uses virtual DOM to render the view. As the name suggests, virtual DOM is a virtual representation of the real DOM. Each time the data changes in a react app, a new virtual DOM gets created. Creating a virtual DOM is much faster than rendering the UI inside the browser. Therefore, with the use of virtual DOM, the efficiency of the app improves.
  • Gentle learning curve
    React has a gentle learning curve when compared to frameworks like Angular. Anyone with little knowledge of javascript can start building web applications using React.
  • SEO friendly
    React allows developers to develop engaging user interfaces that can be easily navigated in various search engines. It also allows server-side rendering, which boosts the SEO of an app.
  • Reusable components
    React uses component-based architecture for developing applications. Components are independent and reusable bits of code. These components can be shared across various applications having similar functionality. The re-use of components increases the pace of development.
  • Huge ecosystem of libraries to choose from
    React provides you the freedom to choose the tools, libraries, and architecture for developing an application based on your requirement.


2. What is JSX?

JSX stands for JavaScript XML.
It allows us to write HTML inside JavaScript and place them in the DOM without using functions like appendChild( ) or createElement( ).
As stated in the official docs of React, JSX provides syntactic sugar for React.createElement( ) function.
**Note- We can create react applications without using JSX as well.
Let’s understand how JSX works:

Without using JSX, we would have to create an element by the following process:
const text = React.createElement('p', {}, 'This is a text');
const container = React.createElement('div','{}',text );
ReactDOM.render(container,rootElement);

Using JSX, the above code can be simplified:
const container = (
 <div>
   <p>This is a text</p>
 </div>
);
ReactDOM.render(container,rootElement);

As one can see in the code above, we are directly using HTML inside JavaScript.

3. What are the differences between functional and class components?

Before the introduction of Hooks in React, functional components were called stateless components and were behind class components on feature basis. After the introduction of Hooks, functional components are equivalent to class components.
Although functional components are the new trend, the react team insists on keeping class components in React. Therefore, it is important to know how these both components differ.
On the following basis let’s compare functional and class components:

  • Decalaration
    Functional components are nothing but JavaScript functions and therefore can be declared using an arrow function or the function keyword:
    function card(props){
     return(
       <div className="main-container">
         <h2>Title of the card</h2>
       </div>
     )
    }
    
    const card = (props) =>{
     return(
       <div className="main-container">
         <h2>Title of the card</h2>
       </div>
     )
    }
    

    Class components on the other hand, are declared using the ES6 class:
    class Card extends React.Component{
     constructor(props){
       super(props);
     }
    
     render(){
       return(
         <div className="main-container">
           <h2>Title of the card</h2>
         </div>
       )
     }
    }


  • Handling props
    Let’s render the following component with props and analyse how functional and class components handle props:
    <StudentInfo name="Vivek" rollNumber="23" />
    

    In functional components, the handling of props is pretty straight forward. Any prop provided as an argument to a functional component, can be directly used inside HTML elements:
    function StudentInfo(props){
     return(
       <div className="main">
         <h2>{props.name}</h2>
         <h4>{props.rollNumber}</h4>
       </div>
     )
    }
    

    In the case of class components, props are handled in a different way:
    class StudentInfo extends React.Component{
     constructor(props){
       super(props);
     }
    
     render(){
       return(
         <div className="main">
           <h2>{this.props.name}</h2>
           <h4>{this.props.rollNumber}</h4> 
         </div>
       )
     }
    }
    
    As we can see in the code above, this keyword is used in the case of class components.

  • Handling state
    Functional components use React hooks to handle state.
    It uses the useState hook to set state of a variable inside the component:

    function ClassRoom(props){
     let [studentsCount,setStudentsCount] = useState(0);
    
     const addStudent = () => {
       setStudentsCount(++studentsCount);
     }
     return(
       <div>
         <p>Number of students in class room: {studentsCount}</p>
         <button onClick={addStudent}>Add Student</button>
       </div>
     )
    }
    

    Since useState hook returns an array of two items, the first item contains the current state, and the second item is a function used to update the state.
    In the code above, using array destructuring we have set the variable name to studentsCount with a current value of “0” and setStudentsCount is the function that is used to update the state.
    For reading the state, we can see from the code above, the variable name can be directly used to read the current state of the variable.
    We cannot use React Hooks inside class components, therefore state handling is done very differently in a class component:
    Let’s take the same above example and convert it into a class component:

    class ClassRoom extends React.Component{
              constructor(props){
                super(props);
                this.state = {studentsCount : 0};
             
                this.addStudent = this.addStudent.bind(this);
              }
             
              addStudent(){
                this.setState((prevState)=>{
                  return {studentsCount: prevState.studentsCount++}
                });
              }
             
              render(){
                return(
                  <div>
                    <p>Number of students in class room: {this.state.studentsCount}</p>
                    <button onClick={this.addStudent}>Add Student</button>
                  </div>
                )
              }
             }
             

    In the code above, we see we are using this.state to add the variable studentsCount and setting the value to “0”.
    For reading the state, we are using this.state.studentsCount.
    For updating the state, we need to first bind the addStudent function to this. Only then, we will be able to use the setState function which is used to update the state.


4. What is the virtual DOM? How does react use the virtual DOM to render the UI?

As stated by the react team, virtual DOM is a concept where a virtual representation of the real DOM is kept inside the memory and is synced with the real DOM by a library such as ReactDOM.


Why was virtual DOM introduced? DOM manipulation is an integral part of any web application, but DOM manipulation is quite slow when compared to other operations in JavaScript.
The efficiency of the application gets affected when several DOM manipulations are being done. Most JavaScript frameworks update the entire DOM even when a small part of the DOM changes.
For example, consider a list that is being rendered inside the DOM. If one of the items in the list changes, the entire list gets rendered again instead of just rendering the item that was changed/updated. This is called inefficient updating.
To address the problem of inefficient updating, the react team introduced the concept of virtual DOM.

How does it work?


For every DOM object, there is a corresponding virtual DOM object(copy), which has the same properties.
The main difference between the real DOM object and the virtual DOM object is that any changes in the virtual DOM object will not reflect on the screen directly. Consider a virtual DOM object as a blueprint of the real DOM object.
Whenever a JSX element gets rendered, every virtual DOM object gets updated.

**Note- One may think updating every virtual DOM object might be inefficient, but that’s not the case. Updating the virtual DOM is much faster than updating the real DOM since we are just updating the blueprint of the real DOM.

React uses two virtual DOMs to render the user interface. One of them is used to store the current state of the objects and the other to store the previous state of the objects.
Whenever the virtual DOM gets updated, react compares the two virtual DOMs and gets to know about which virtual DOM objects were updated.
After knowing which objects were updated, react renders only those objects inside the real DOM instead of rendering the complete real DOM.
This way, with the use of virtual DOM, react solves the problem of inefficient updating.

5. What are the differences between controlled and uncontrolled components?

Controlled and uncontrolled components are just different approaches to handling input form elements in react.
FeatureUncontrolledControlledName attrs
One-time value retrieval (e.g. on submit)✔️✔️✔️
Validating on submit✔️✔️✔️
Field-level Validation✔️✔️
Conditionally disabling submit button✔️✔️
Enforcing input format✔️✔️
several inputs for one piece of data✔️✔️
dynamic inputs✔️🤔

Controlled component In a controlled component, the value of the input element is controlled by React.
We store the state of the input element inside the code, and by using event-based callbacks, any changes made to the input element will be reflected in the code as well.
When a user enters data inside the input element of a controlled component, onChange function gets triggered and inside the code we check whether the value entered is valid or invalid. If the value is valid, we change the state and re-render the input element with new value.
Example of a controlled component:
function FormValidation(props) {
 let [inputValue, setInputValue] = useState("");

 let updateInput = e => {
   setInputValue(e.target.value);
 };

 return (
   <div>
     <form>
       <input type="text" value={inputValue} onChange={updateInput} />
     </form>
   </div>
 );
}

As one can see in the code above, the value of the input element is determined by the state of the inputValue variable. Any changes made to the input element is handled by the updateInput function.

Uncontrolled component In an uncontrolled component, the value of the input element is handled by the DOM itself.
Input elements inside uncontrolled components work just like normal HTML input form elements.
The state of the input element is handled by the DOM. Whenever the value of the input element is changed,event-based callbacks are not called. Basically, react does not perform any action when there are changes made to the input element.
Whenever use enters data inside the input field, the updated data is shown directly. To access the value of the input element, we can use ref.
Example of an uncontrolled component:
function FormValidation(props) {
 let inputValue = React.createRef();

 let handleSubmit = e => {
   alert(`Input value: ${inputValue.current.value}`);
   e.preventDefault();
 };

 return (
   <div>
     <form onSubmit={handleSubmit}>
       <input type="text" ref={inputValue} />
       <button type="submit">Submit</button>
     </form>
   </div>
 );
}

As one can see in the code above, we are not using onChange function to govern the changes made to the input element. Instead, we are using ref to access the value of the input element.

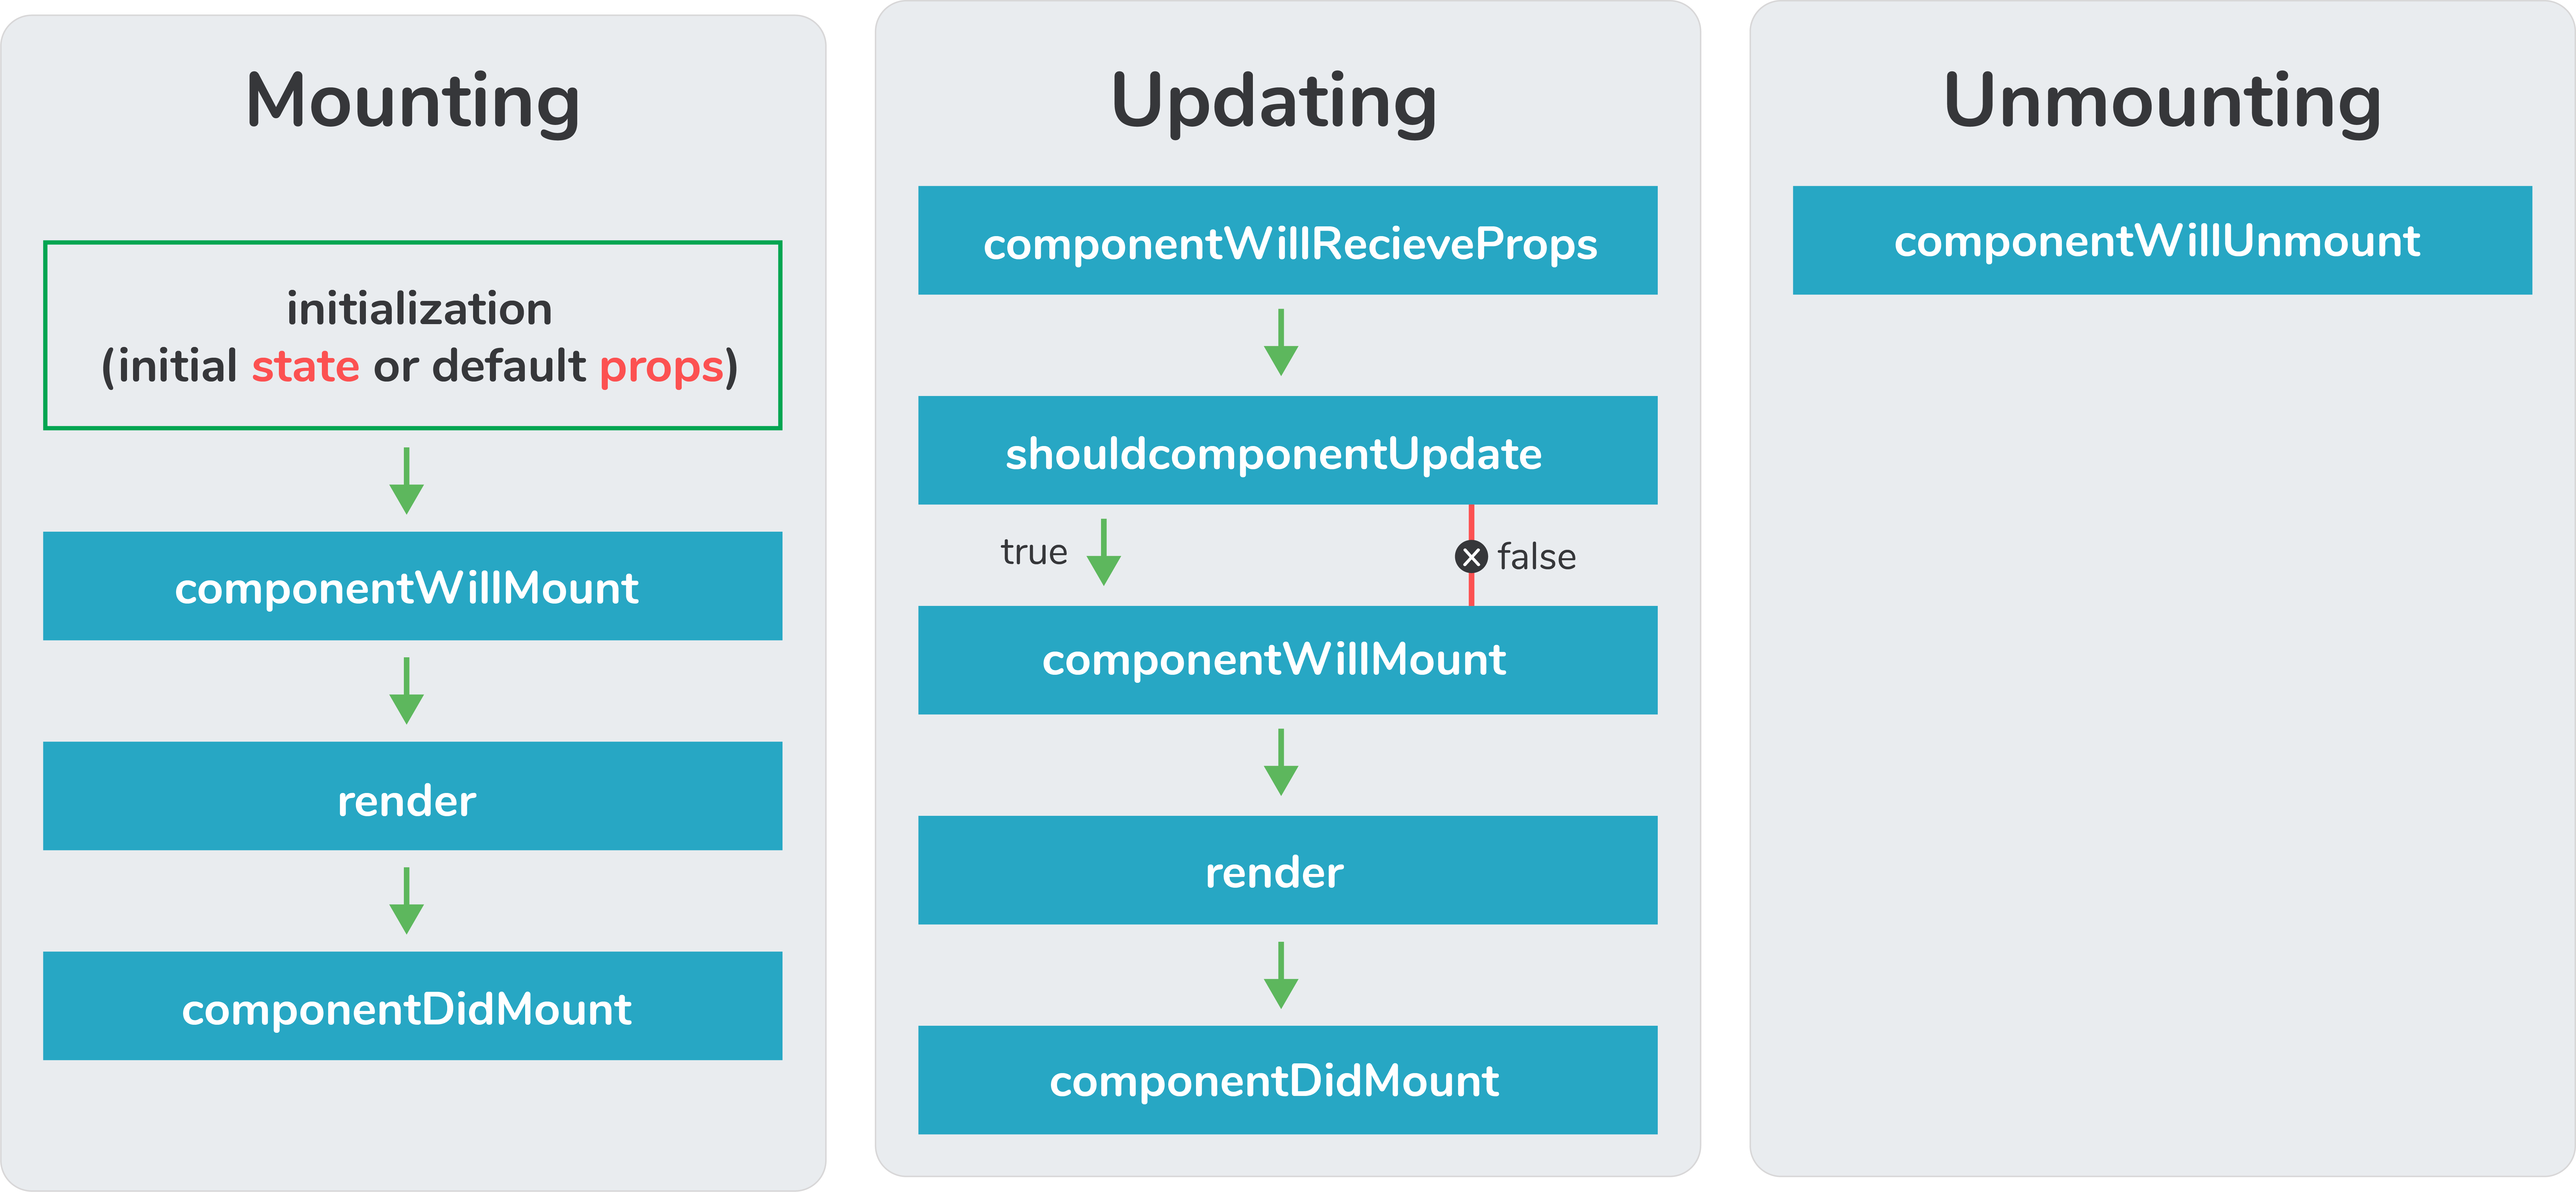
6. What are the different lifecycle methods in React?

Every component in React has lifecycle methods that we can tap into, to trigger changes at a particular phase of the life cycle.
Each component in react goes through three phases: MountingUpdating, and Unmounting.
There are corresponding lifecycle methods for each of the three phases:

**Note- In this article, we are discussing the use of lifecycle methods in class components. For utilising lifecycle methods in functional components, react hooks are used.


Mounting:


There are four built-in lifecycle methods that are called in the following order when a component is mounted:
constructor( ) - This is called before anything else. We can set the initial state of the component inside this method. The constructor method is used to set the initial state and bind methods to the component.
getDerivedStateFromProps( ) - This is called before rendering the elements in the DOM.
In this method, we can set the state of the component based on the props we received. This method is used very rarely.
render( ) - This is the only required method in the class component. This method returns the HTML elements which are going to be rendered inside the DOM.
componentDidMount( ) - It is called right after the component is rendered inside the DOM. All the statements which require the DOM nodes can be executed in this method. Network requests from a remote end-point can also be instantiated in this method.

Updating:


Updates in react are caused by changes in state or props. Update leads to re-rendering of the component. The following methods are called when a component is re-rendered:
getDerivedStateFromProps( ) - This method is called again when a component is being re-rendered.
shouldComponentUpdate( ) - This method is called before rendering the component when new props are received. It lets React know if the component’s output is affected by the newly received props or by the state change. By default, it returns true.
render( ) - To re-render the HTML inside the DOM, the render( ) method gets called again.
getSnapshotBeforeUpdate( ) - This method is called just before the newly rendered HTML gets committed to the DOM. It stores the previous state of the component so that React has an idea of what parts of the DOM needs to be updated.
componentDidUpdate( ) - It is called after the component gets re-rendered. This method works just like the componentDidMount( ) method, the difference is that this method does not get called on initial render.

Unmounting:


componentWillUnmount( ) - This method is called just before the component gets destroyed. Any clean up statements should be executed inside this method.

7. Explain Strict Mode in React.

StrictMode is a tool added in the version 16.3 of React to highlight potential problems in an application. It performs additional checks on the application.
function App() {
  return (
    <React.StrictMode>
      <div classname="App">
        <Header/>
        <div>
          Page Content
        </div>
        <Footer/>
      </div>
    </React.StrictMode>
  );
}

To enable StrictMode, &lt;React.StrictMode&gt; tags need to be added inside the application:
import React from "react";
import ReactDOM from "react-dom";

import App from "./App";

const rootElement = document.getElementById("root");
ReactDOM.render(
 <React.StrictMode>
   <App />
 </React.StrictMode>,
 rootElement
);

StrictMode currently helps with the following issues:
  • Identifying components with unsafe lifecycle methods
    Certain lifecycle methods are unsafe to use in asynchronous react applications. With the use of third-party libraries it becomes difficult to ensure that certain lifecycle methods are not used.
    StrictMode helps in providing us a warning if any of the class components uses an unsafe lifecycle method.

  • Warning about the usage of legacy string API
    If one is using an older version of React, callback ref is the recommended way to manage refs instead of using the string refs. StrictMode gives a warning if we are using string refs to manage refs.

  • Warning about the usage of findDOMNode
    Previously, findDOMNode( ) method was used to search the tree of a DOM node. This method is deprecated in React. Hence, the StrictMode gives us a warning about the usage of this method.
  • Warning about the usage of legacy context API (because the API is error-prone)


8. How to prevent re-renders in React?

Reason for re-renders in React:
Re-rendering of a component and it’s child components occur when props or state of the component has been changed.
Re-rendering components that are not updated, affects the performance of an application.

How to prevent re-rendering:
Consider the following components:
class Parent extends React.Component {
 state = { messageDisplayed: false };
 componentDidMount() {
   this.setState({ messageDisplayed: true });
 }

 render() {
   console.log("Parent is getting rendered");
   return (
     <div className="App">
       <Message />
     </div>
   );
 }
}

class Message extends React.Component {
 constructor(props) {
   super(props);
   this.state = { message: "Hello, this is vivek" };
 }  
 render() {
   console.log("Message is getting rendered");
   return (
     <div>
       <p>{this.state.message}</p>
     </div>
   );
 }
}

Parent component is the parent component and Message is the child component. Any change in the parent component will lead to re-rendering of the child component as well.
To prevent the re-rendering of child component, we use the shouldComponentUpdate( ) method:

**Note- Use shouldComponentUpdate( ) method only when you are sure that it’s a static component.
class Message extends React.Component {
 constructor(props) {
   super(props);
   this.state = { message: "Hello, this is vivek" };
 }
 shouldComponentUpdate() {
   console.log("Does not get rendered");
   return false;
 }
 render() {
   console.log("Message is getting rendered");
   return (
     <div>
       <p>{this.state.message}</p>
     </div>
   );
 }
}

As one can see in the code above, we have returned false from the shouldComponentUpdate( ) method, which prevents the child component from re-rendering.

9. Explain React state and props.

PropsState
ImmutableOwned by its component
Has better performanceLocally scoped
Can be passed to child componentsWiteable/Mutable
has setState() method to modify properties
Changes to state can be asynchronous
can only be passed as props
React State
Every component in react has a built-in state object, which contains all the property values that belong to that component.
In other words, the state object controls the behaviour of a component. Any change in the property values of the state object leads to re-rendering of the component.

**Note- State object is not available in functional components but, we can use React Hooks to add state to a functional component.

How to declare a state object?
Example:
class Car extends React.Component{
 constructor(props){
   super(props);
   this.state = {
     brand: "BMW",
     color: "black"
   }
 }
}

How to use and update the state object?
class Car extends React.Component {
 constructor(props) {
   super(props);
   this.state = {
     brand: "BMW",
     color: "Black"
   };
 }

 changeColor() {
   this.setState(prevState => {
     return { color: "Red" };
   });
 }

 render() {
   return (
     <div>
       <button onClick={() => this.changeColor()}>Change Color</button>
       <p>{this.state.color}</p>
     </div>
   );
 }
}

As one can see in the code above, we can use the state by calling this.state.propertyName and we can change the state object property using setState method.
React Props
Every react component, accepts a single object argument called props (which stands for “properties”).
These props can be passed to a component using HTML attributes and the component accepts these props as an argument.
Using props, we can pass data from one component to another.
Passing props to a component:
While rendering a component, we can pass the props as a HTML attribute:
<Car brand="Mercedes"/>

The component receives the props:
In Class component:
class Car extends React.Component {
 constructor(props) {
   super(props);
   this.state = {
     brand: this.props.brand,
     color: "Black"
   };
 }
}

In Functional component:
function Car(props) {
 let [brand, setBrand] = useState(props.brand);
}

****Note- Props are read-only. They cannot be manipulated or changed inside a component.

10. Explain React Hooks.

What are Hooks? Hooks are functions that let us “hook into” React state and lifecycle features from a functional component.
React Hooks cannot be used in class components. They let us write components without class.

Why were Hooks introduced in React?
React hooks were introduced in the 16.8 version of React.
Previously, functional components were called stateless components. Only class components were used for state management and lifecycle methods.
The need to change a functional component to a class component, whenever state management or lifecycle methods were to be used, led to the development of Hooks.
Example of a hook:
useState hook:
In functional components, useState hook lets us define state for a component:
function Person(props) {
 // We are declaring a state variable called name.
 // setName is a function to update/change the value of name
 let [name, setName] = useState('');
}

The state variable “name” can be directly used inside the HTML.

11. What are the different ways to style a React component?

There are many different ways through which one can style a React component. Some of the ways are :
  • Inline Styling
    We can directly style an element using inline style attributes.
    Make sure the value of style is a JavaScript object:
    class RandomComponent extends React.Component {
     render() {
       return (
         <div>
           <h3 style={{ color: "Yellow" }}>This is a heading</h3>
           <p style={{ fontSize: "32px" }}>This is a paragraph</p>
         </div>
       );
     }
    }
    
  • Using JavaScript object
    We can create a separate JavaScript object and set the desired style properties.
    This object can be used as the value of the inline style attribute.
    class RandomComponent extends React.Component {
     paragraphStyles = {
       color: "Red",
       fontSize: "32px"
     };
    
     headingStyles = {
       color: "blue",
       fontSize: "48px"
     };
    
     render() {
       return (
         <div>
           <h3 style={this.headingStyles}>This is a heading</h3>
           <p style={this.paragraphStyles}>This is a paragraph</p>
         </div>
       );
     }
    }
    
  • CSS Stylesheet
    We can create a separate CSS file and write all the styles for the component inside that file. This file needs to be imported inside the component file.
    import './RandomComponent.css';
    
    class RandomComponent extends React.Component {
     render() {
       return (
         <div>
           <h3 className="heading">This is a heading</h3>
           <p className="paragraph">This is a paragraph</p>
         </div>
       );
     }
    }
    
  • CSS Modules
    We can create a separate CSS module and import this module inside our component. Create a file with “.module.css”‘ extension,
    styles.module.css:
    .paragraph{
     color:"red";
     border:1px solid black;
    }
    

    We can import this file inside the component and use it:
    import styles from  './styles.module.css';
    
    class RandomComponent extends React.Component {
     render() {
       return (
         <div>
           <h3 className="heading">This is a heading</h3>
           <p className={styles.paragraph} >This is a paragraph</p>
         </div>
       );
     }
    }


12. Name a few techniques to optimize React app performance.

There are many ways through which one can optimize the performance of a React app, let’s have a look at some of them:

  • Using useMemo( ) -
    It is a React hook that is used for caching CPU-Expensive functions.
    Sometimes in a React app, a CPU-Expensive function gets called repeatedly due to re-renders of a component, which can lead to slow rendering.
    useMemo( ) hook can be used to cache such functions. By using useMemo( ), the CPU-Expensive function gets called only when it is needed.

  • Using React.PureComponent -
    It is a base component class that checks state and props of a component to know whether the component should be updated.
    Instead of using the simple React.Component, we can use React.PureComponent to reduce the re-renders of a component unnecessarily.

  • Maintaining State Colocation -
    This is a process of moving the state as close to where you need it as possible.
    Sometimes in React app, we have a lot of unnecessary states inside the parent component which makes the code less readable and harder to maintain. Not to forget, having many states inside a single component leads to unnecessary re-renders for the component.
    It is better to shift states which are less valuable to the parent component, to a separate component.

  • Lazy Loading -
    It is a technique used to reduce the load time of a React app. Lazy loading helps reduce the risk of web app performances to minimal.


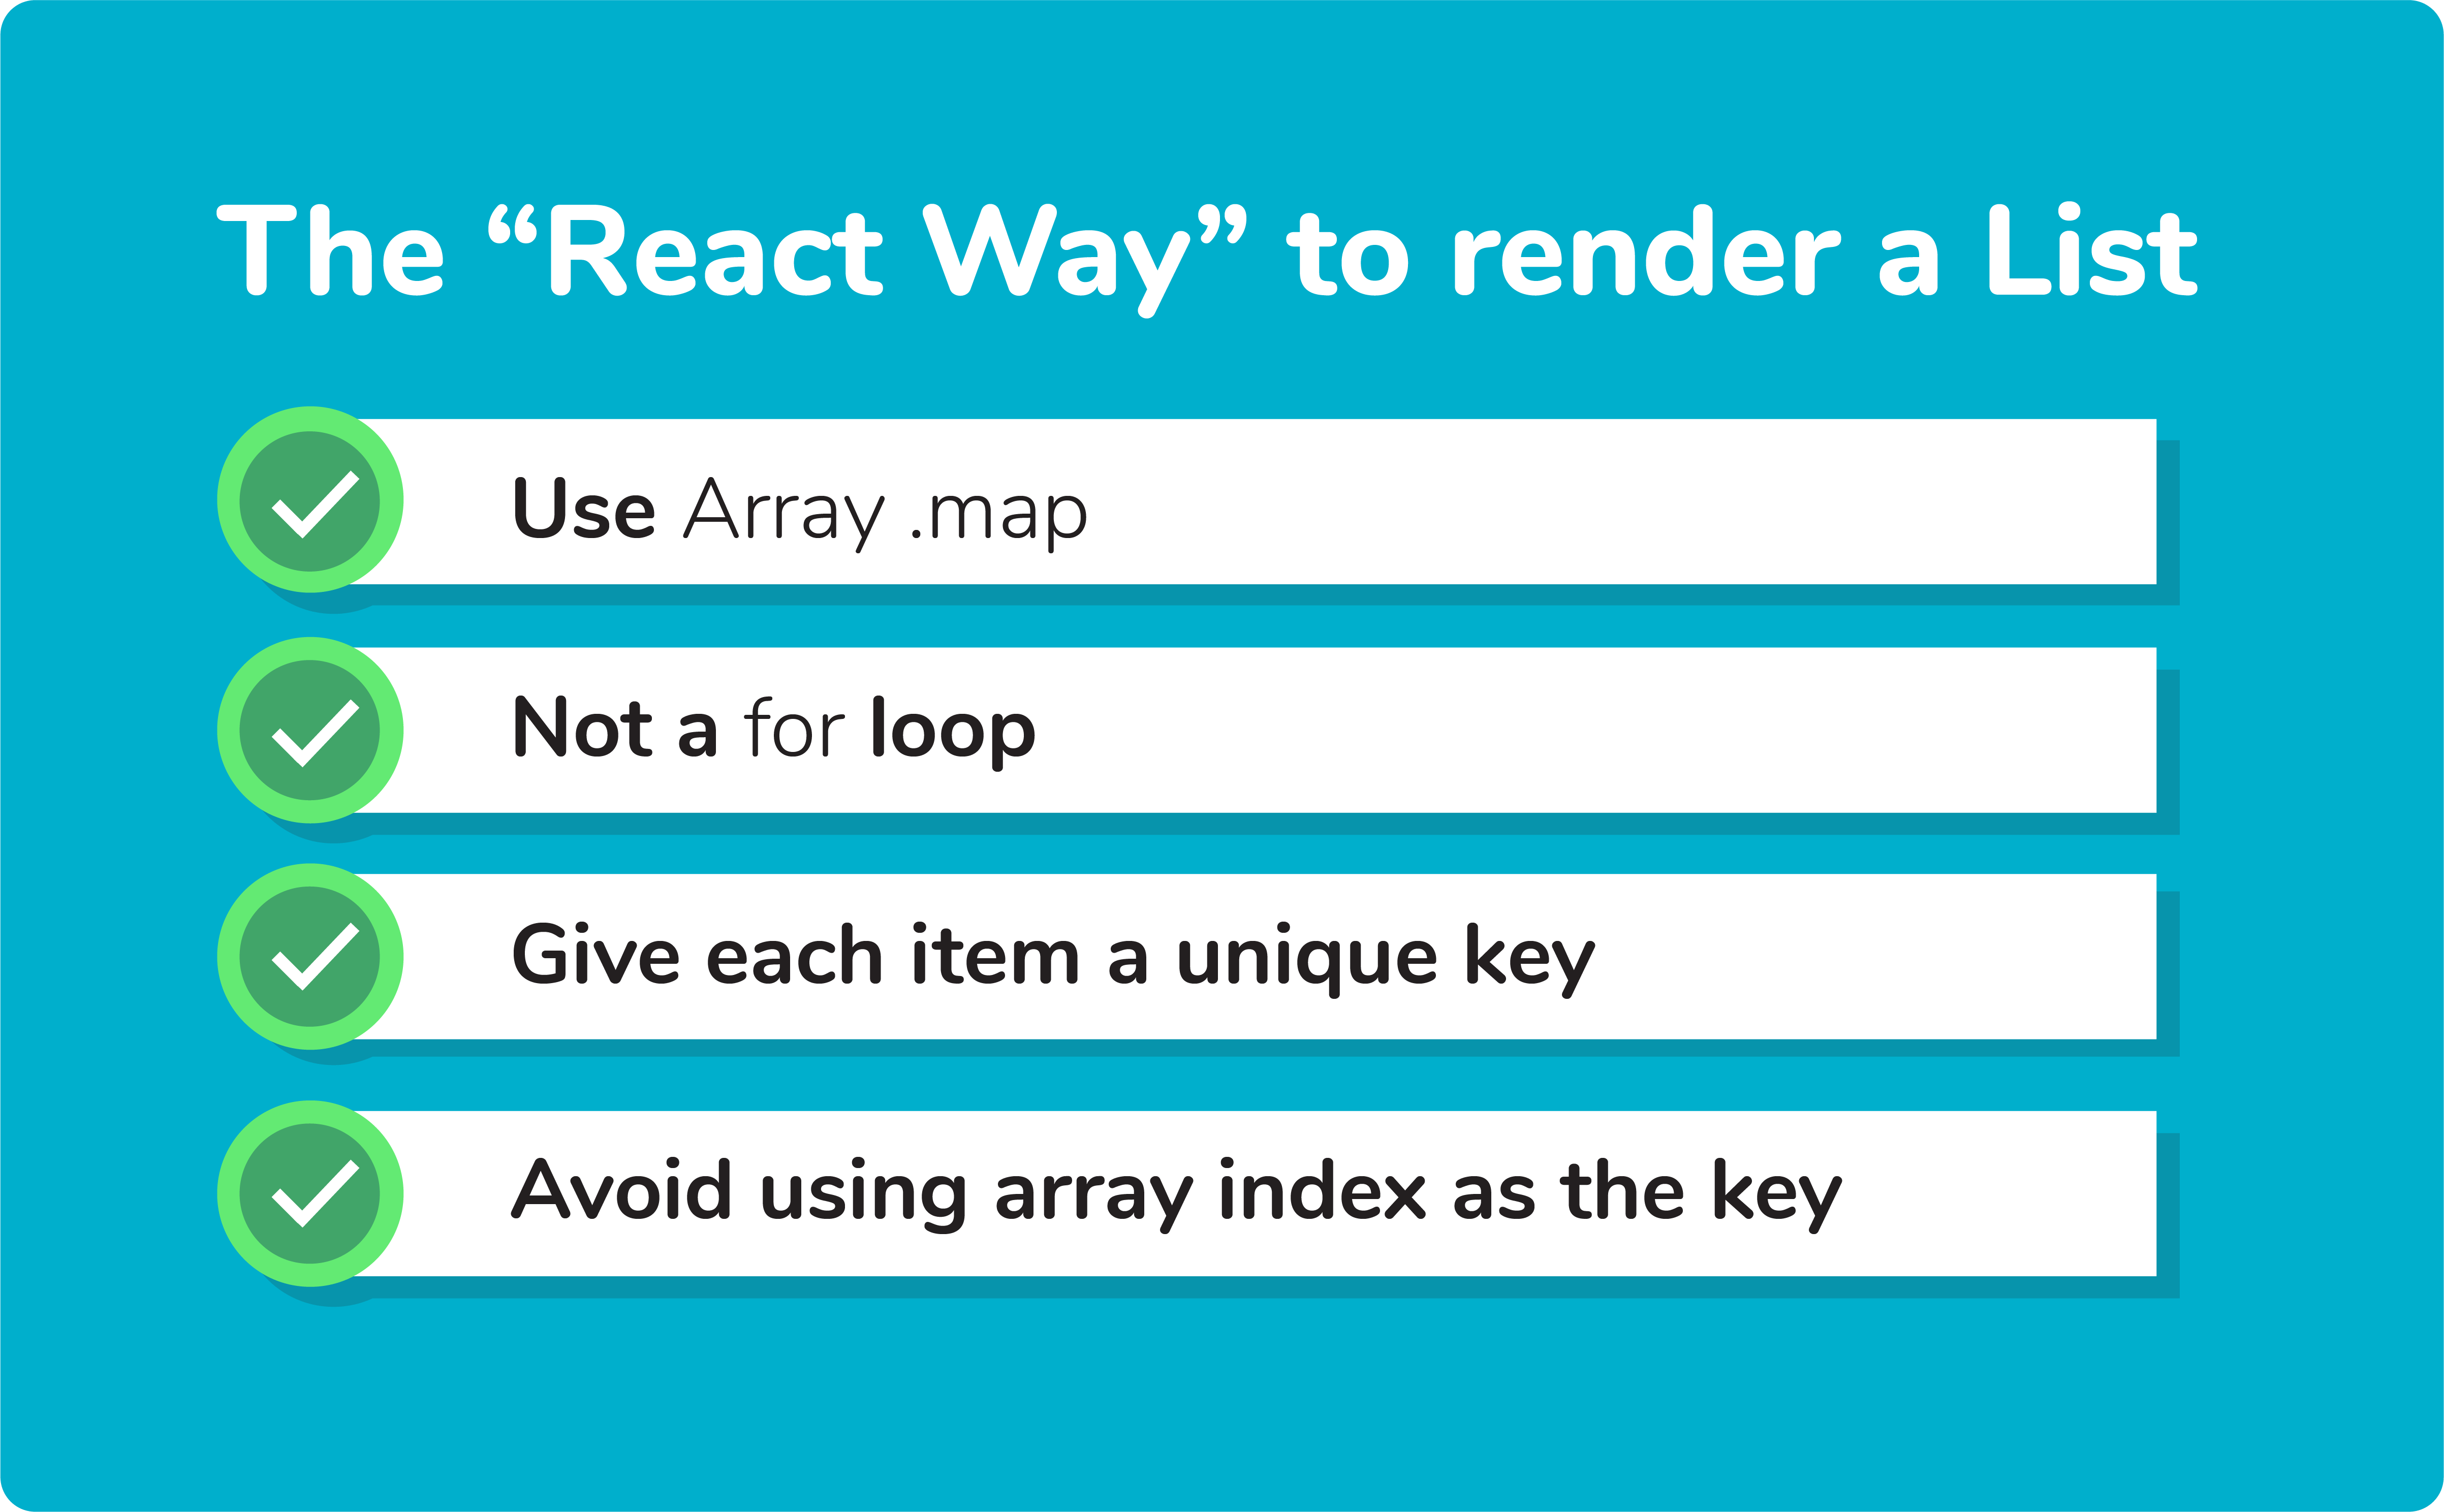
13. What are keys in React?

A key is a special string attribute that needs to be included when using lists of elements.
Example of a list using key:
const ids = [1,2,3,4,5];
const listElements = ids.map((id)=>{
 return(
 <li key={id.toString()}>
   {id}
 </li>
 )
})

Importance of keys
Keys help react identify which elements were added, changed or removed.
Keys should be given to array elements for providing a unique identity for each element.
Without keys, React does not understand the order or uniqueness of each element.
With keys, React has an idea of which particular element was deleted,edited, and added.
Keys are generally used for displaying a list of data coming from an API.
***Note- Keys used within arrays should be unique among siblings. They need not be globally unique.

14. How to pass data between react components?

Parent Component to Child Component (using props)
With the help of props, we can send data from a parent to a child component.
How do we do this?

Consider the following Parent Component:
import ChildComponent from "./Child";

    function ParentComponent(props) {
     let [counter, setCounter] = useState(0);
    
     let increment = () => setCounter(++counter);
    
     return (
       <div>
         <button onClick={increment}>Increment Counter</button>
         <ChildComponent counterValue={counter} />
       </div>
     );
    }
    

As one can see in the code above, we are rendering the child component inside the parent component, by providing a prop called counterValue. Value of the counter is being passed from the parent to the child component.
We can use the data passed by the parent component in the following way:
function ChildComponent(props) {
 return (
   <div>
     <p>Value of counter: {props.counterValue}</p>
   </div>
 );
}

We use the props.counterValue to display the data passed on by the parent component.
Child Component to Parent Component (using callbacks)
This one is a bit tricky. We follow the steps below:
  • Create a callback in the parent component which takes in the data needed as a parameter.
  • Pass this callback as a prop to the child component.
  • Send data from the child component using the callback.
We are considering the same example above but in this case, we are going to pass the updated counterValue from child to parent.
Step1 and Step2: Create a callback in the parent component, pass this callback as a prop.
function ParentComponent(props) {
 let [counter, setCounter] = useState(0);

 let callback = valueFromChild => setCounter(valueFromChild);

 return (
   <div>
     <p>Value of counter: {counter}</p>
     <ChildComponent callbackFunc={callback} counterValue={counter} />
   </div>
 );
}

As one can see in the code above, we created a function called callback which takes in the data received from the child component as a parameter.
Next, we passed the function callback as a prop to the child component.
Step3: Pass data from child to the parent component.
function ChildComponent(props) {
 let childCounterValue = props.counterValue;

 return (
   <div>
     <button onClick={() => props.callbackFunc(++childCounterValue)}>
       Increment Counter
     </button>
   </div>
 );
}

In the code above, we have used the props.counterValue and set it to a variable called childCounterValue.
Next, on button click, we pass the incremented childCounterValue to the props.callbackFunc.
This way, we can pass data from the child to the parent component.

15. What are Higher Order Components?

Simply put, Higher Order Component(HOC) is a function that takes in a component and returns a new component.

When do we need a Higher Order Component?
While developing React applications, we might develop components that are quite similar to each other with minute differences.
In most cases, developing similar components might not be an issue but, while developing larger applications we need to keep our code DRY, therefore, we want an abstraction that allows us to define this logic in a single place and share it across components.
HOC allows us to create that abstraction.
Example of a HOC:
Consider the following components having similar functionality
The following component displays the list of articles:
class ArticlesList extends React.Component{
 constructor(props){
   super(props);
   this.handleChange = this.handleChange.bind(this);
   this.state = {
     articles : API.getArticles();
   }
 }

  componentDidMount() {
   //Listen to changes made in the API
   API.addChangeListener(this.handleChange);
 }

 componentWillUnmount() {
   // Clean up listener
   API.removeChangeListener(this.handleChange);
 }

 handleChange() {
   // Update the articles variable whenever the API changes
   this.setState({
     articles: DataSource.getArticles()
   });
 }

 render(){
   return(
     <div>
       {this.state.articles.map((article)=>(
         <ArticleData article={article} key={article.id}/>
       ))}
     </div>
   )
 }
}

The following component displays the list of users:
class UsersList extends React.Component{
      constructor(props){
        super(props);
        this.handleChange = this.handleChange.bind(this);
        this.state = {
          users : API.getUsers();
        }
      }
     
       componentDidMount() {
        //Listen to changes made in the API
        API.addChangeListener(this.handleChange);
      }
     
      componentWillUnmount() {
        // Clean up listener
        API.removeChangeListener(this.handleChange);
      }
     
      handleChange() {
        // Update the users variable whenever the API changes
        this.setState({
          users: DataSource.getUsers()
        });
      }
     
      render(){
        return(
          <div>
            {this.state.users.map((user)=>(
              <UserData user={user} key={user.id}/>
            ))}
          </div>
        )
      }
     }
     

Notice the above components, both have similar functionality but, they are calling different methods to an API endpoint.
Let’s create a Higher Order Component to create an abstraction:
class UsersList extends React.Component{
      constructor(props){
        super(props);
        this.handleChange = this.handleChange.bind(this);
        this.state = {
          users : API.getUsers();
        }
      }
     
       componentDidMount() {
        //Listen to changes made in the API
        API.addChangeListener(this.handleChange);
      }
     
      componentWillUnmount() {
        // Clean up listener
        API.removeChangeListener(this.handleChange);
      }
     
      handleChange() {
        // Update the users variable whenever the API changes
        this.setState({
          users: DataSource.getUsers()
        });
      }
     
      render(){
        return(
          <div>
            {this.state.users.map((user)=>(
              <UserData user={user} key={user.id}/>
            ))}
          </div>
        )
      }
     }
     

We know HOC is a function that takes in a component and returns a component.
In the code above, we have created a function called HOC which returns a component and performs a functionality that can be shared across both ArticlesList component and UsersList Component.
The second parameter in the HOC function is the function that calls the method on the API endpoint.
We have reduced the duplicated code of the componentDidUpdate and componentDidMount functions.
Using the concept of Higher Order Components, we can now render the ArticlesList and UsersList component in the following way:
const UsersListWithHOC = HOC(UsersList, (API) => API.getUsers());

const ArticlesListWithHOC = HOC(ArticlesList, (API)=> API.getArticles());

Remember, we are not trying to change the functionality of each component, we are trying to share a single functionality across multiple components using HOC.

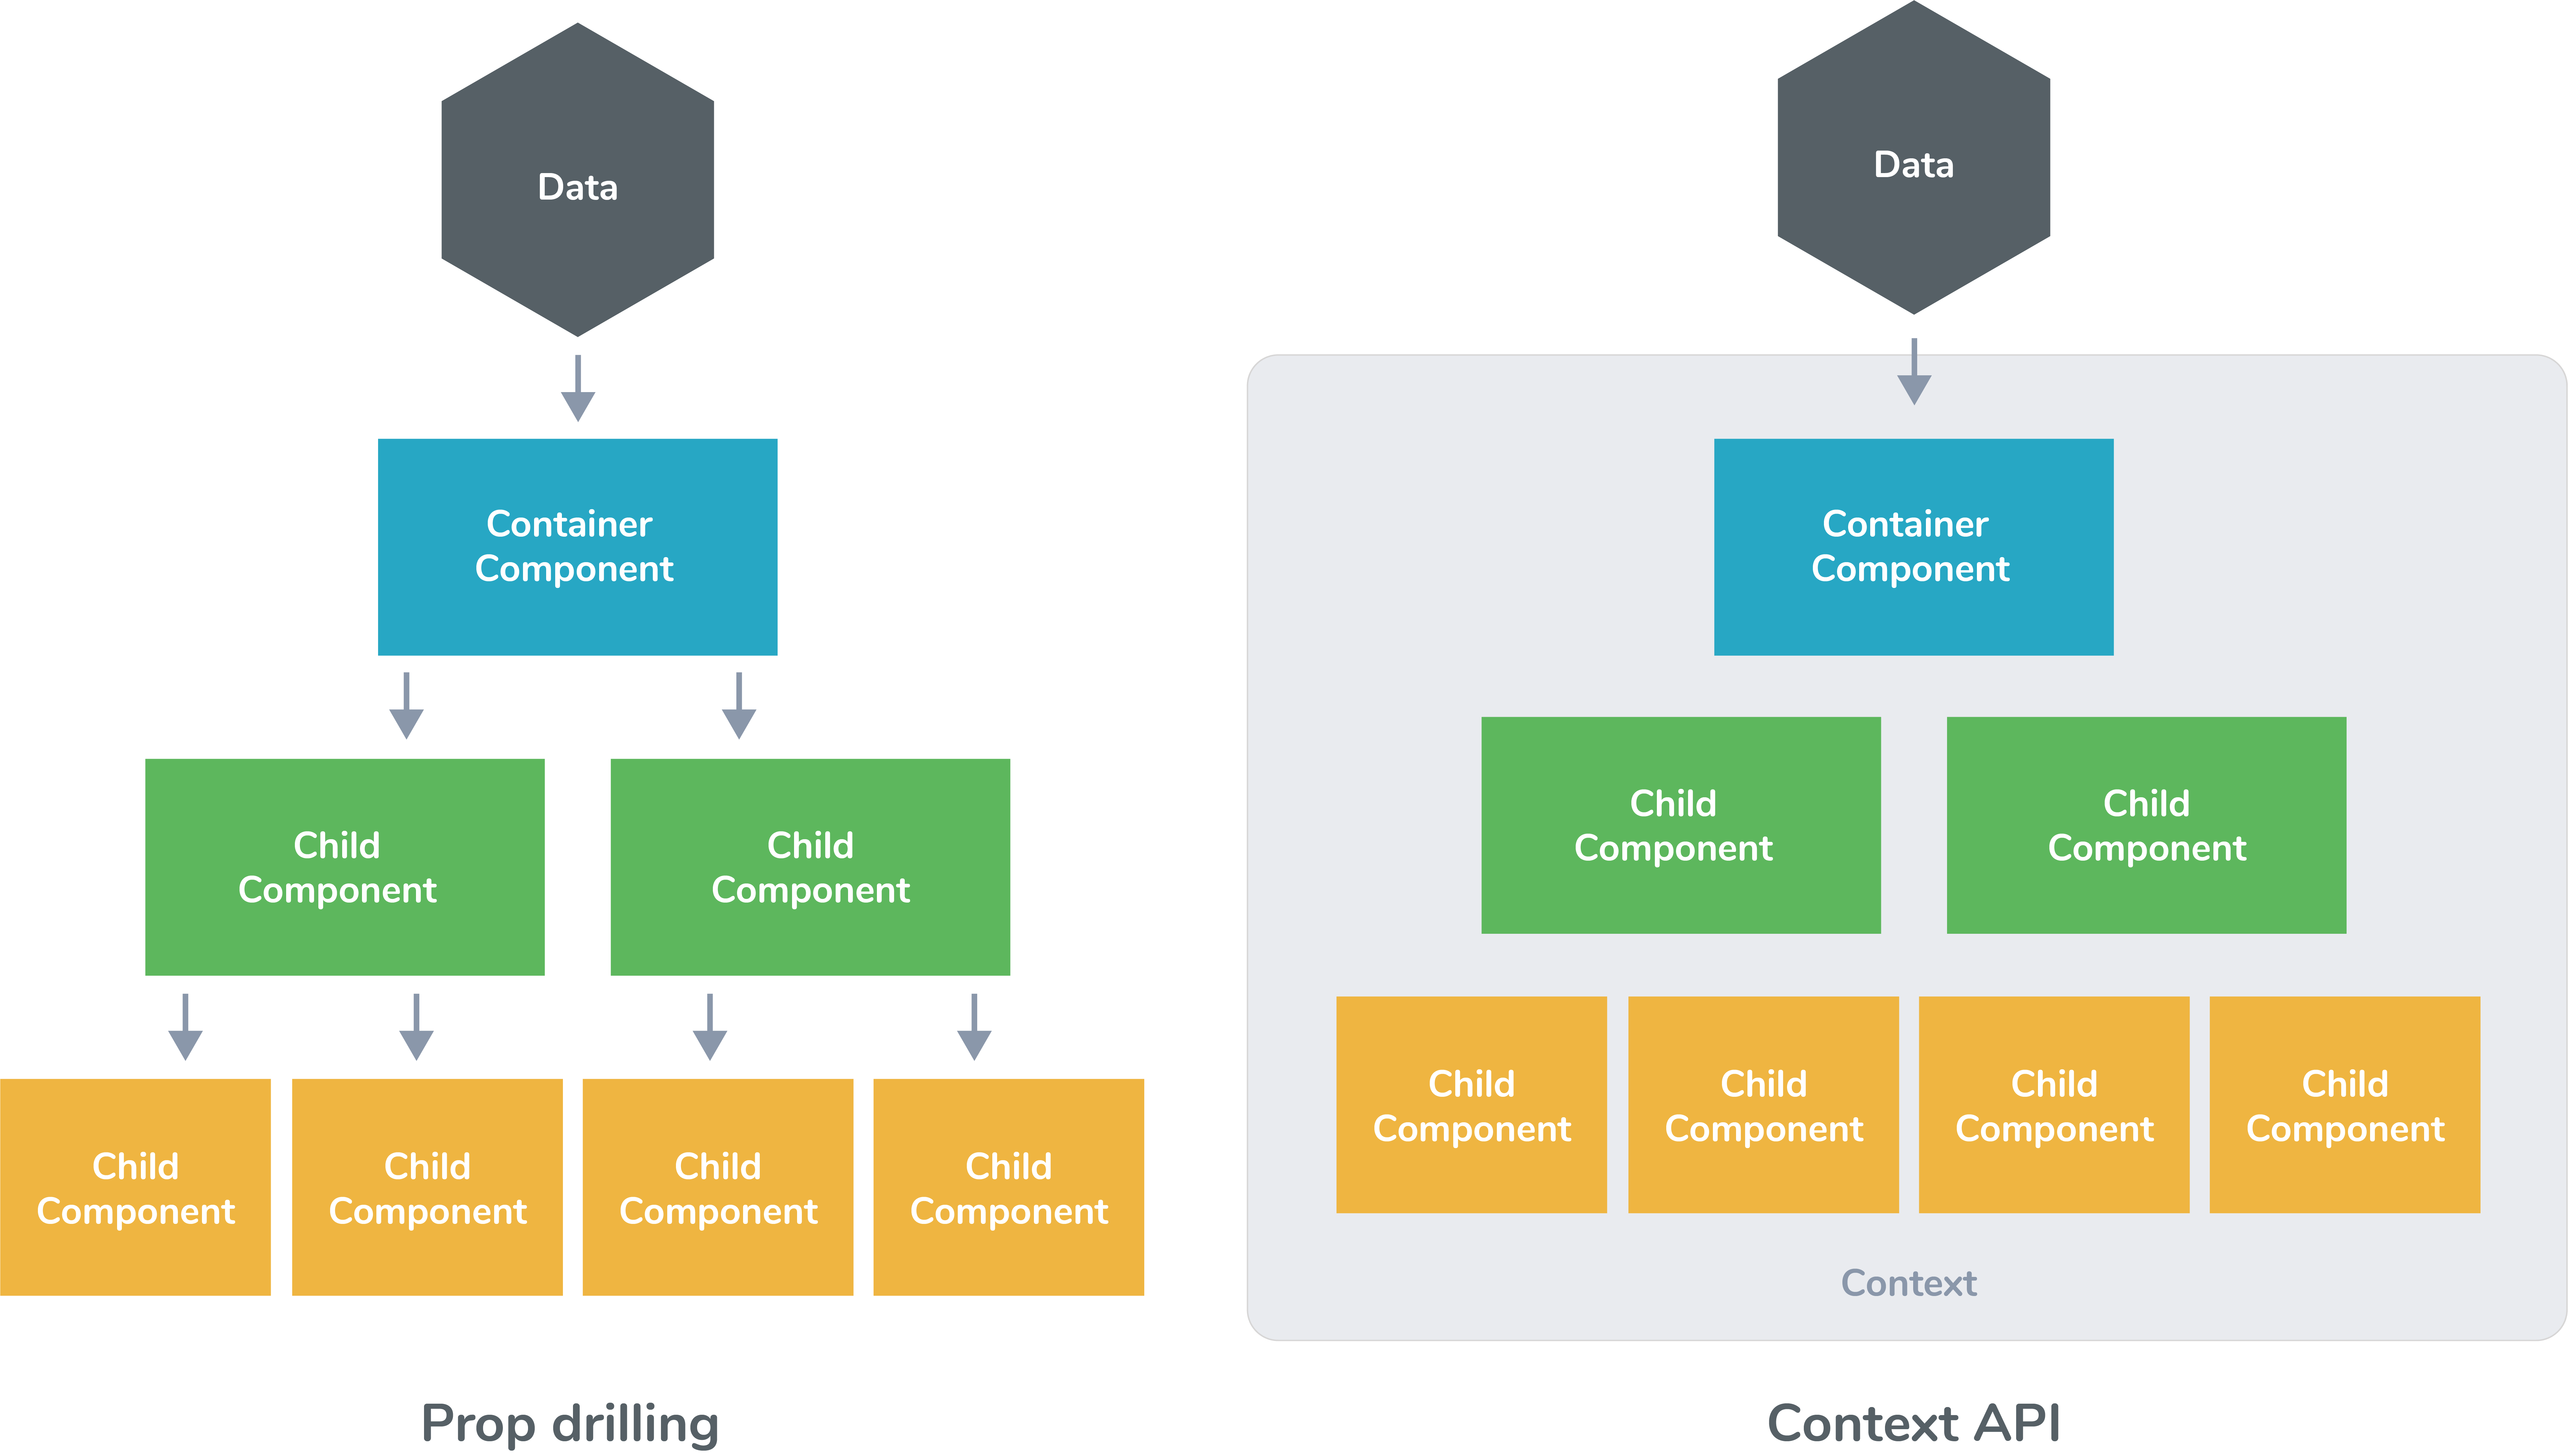
16. What is prop drilling in React?

Sometimes while developing React applications, there is a need to pass data from a component that is higher in the hierarchy to a component that is deeply nested.
To pass data between such components, we pass props from a source component, and keep passing the prop to the next component in the hierarchy till we reach the deeply nested component.
The disadvantage of using prop drilling is that the components that should otherwise be not aware of the data have access to the data.

17. What are error boundaries?

Introduced in the version 16 of React, Error boundaries provide a way for us to catch errors that occur in the render phase.

What is an error boundary?
Any component which uses one of the following lifecycle methods, is considered an error boundary.
In what places can an error boundary detect an error?
  • Render phase
  • Inside a lifecycle method
  • Inside the constructor
Without using error boundaries:
class CounterComponent extends React.Component{
 constructor(props){
   super(props);
   this.state = {
     counterValue: 0
   }
   this.incrementCounter = this.incrementCounter.bind(this);
 }

 incrementCounter(){
   this.setState(prevState => counterValue = prevState+1);
 }

 render(){
   if(this.state.counter === 2){
     throw new Error('Crashed');
   }

   return(
     <div>
       <button onClick={this.incrementCounter}>Increment Value</button>
       <p>Value of counter: {this.state.counterValue}</p>
     </div>
   )
 }
}

In the code above, when the counterValue equals to 2, we throw an error inside the render method.
When we are not using the error boundary, instead of seeing an error, we see a blank page.
Since any error inside the render method, leads to unmounting of the component.
To display an error that occurs inside the render method, we use error boundaries.

With error boundaries:
As mentioned above, error boundary is a component using one or both of the following methods:

static getDerivedStateFromError and componentDidCatch.
Let’s create an error boundary to handle errors in render phase:
class ErrorBoundary extends React.Component {
 constructor(props) {
   super(props);
   this.state = { hasError: false };
 }

 static getDerivedStateFromError(error) {     
   return { hasError: true }; 
 }
  componentDidCatch(error, errorInfo) {       
   logErrorToMyService(error, errorInfo); 
 }

 render() {
   if (this.state.hasError) {     
     return <h4>Something went wrong</h4>     
   }
   return this.props.children;
 }
}

In the code above, getDerivedStateFromError function renders the fallback UI interface when the render method has an error.
componentDidCatch logs the error information to an error tracking service.
Now with error boundary, we can render the CounterComponent in the following way:
<ErrorBoundary>
  <CounterComponent/>
</ErrorBoundary>


40 Latest Interview Questions and Answers on Spring, Spring MVC, and Spring Boot

  40 Latest Interview Questions and Answers on Spring, Spring MVC, and Spring Boot 1. What is Tight Coupling? When a class (ClassA) is depen...